↓
 

Computer Aid

Ph: 0402 133 866

  • Home
  • Blog
  • Contact
  • Web Services
    • Websites
    • SEO
    • Hosting
    • Domain Names
    • Portfolio
Home→Tags wifi 1 2 >>

Tag Archives: wifi

Post navigation

← Older posts

EasyPeasy networking disabled

Computer Aid Posted on 13 December, 2011 by Luigi Martin13 December, 2011

I recently had a strange problem with my EasyPeasy Netbook.

It took a very long time to start (maybe the battery went flat while in hibernation).

After about a 30 minute wait for startup, I found that the networking was disabled.

Hovering the mouse over the WiFi network symbol at the top of the screen gave the message: Networking Disabled

Ok, I flick the netbook switch to turn off the wifi, and after it goes off, I switch it back on again.

As usual, the WiFi light goes from amber to blue (and the bluetooth also switches on again)… but linux still says networking disabled.

I don’t want to waste much time on this, so a quick internet search finds 2 solutions:

  • delete /var/lib/NetworkManager/NetworkManager.state
  • edit /var/lib/NetworkManager/NetworkManager.state (change the line “NetworkingEnabled” from false to true, save, then restart easypeasy)

I didn’t want to risk deleting a system file, so I edited the state file, and after a restart, everything was back to normal.

Posted in Linux | Tagged EasyPeasy, networking, wifi

How to secure your WiFi wireless home network

Computer Aid Posted on 25 July, 2011 by jjfiasson25 July, 2011

It is crucial to secure your wireless network to ensure that your internet connection can be used only by yourself and people you authorise.  I have seen many occasions where clients have not secured their networks and wondered why their internet bill shot through the roof.  There is also a potential security risk if your wireless network is not secure and you have file sharing turned on – others will be able to access your files! Thankfully the procedure for enabling wireless security is relatively straight forward.

Note: This guide is written with Windows 7 in mind, although the procedure is quite similar for Windows XP and Windows Vista.

This is a guest post by JJ Fiasson from IT Support Sydney.

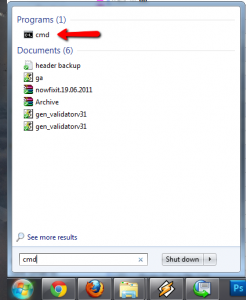
Step 1. Click the windows button in the bottom left hand corner of your task bar. In the search box type “cmd” and hit Enter. A black box will open up with the command prompt.

Step 2. Type in “ipconfig” and hit Enter. We want to know the address of your router, should show up under the entry for “Default Gateway”. The IP will be something like 192.168.1.1 or 10.1.1.1. Write this down.

Step 3. Open your favourite browser and type the number into the address bar that you just wrote down. E.g. http://192.168.1.1

Step 4. Assuming you completed steps 2 & 3 correctly, you will be prompted to enter in a username and password. If your router is a Netgear, the default login should be “admin” as the username and “password” as the password. For Linksys, try “admin” and “admin”. You can also try “admin” and leave the password box empty. If these don’t work, it might be worth Googling for your router make and model with the words “default login”, to try and find out what they are by default. If you can’t seem to track them down, you might need to contact whoever setup your router in the first place and ask them what they set it to. Otherwise, you’ll need to reset the modem/router (not recommended unless you know what you’re doing).

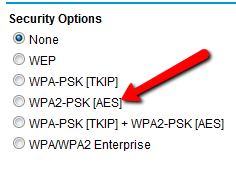
Step 5. Hopefully you figured out the correct login credentials for your router. You should now see a few menu items and a lot of other information. What we are looking for is a menu item labelled “Wireless”, “Wireless Settings” or similar. Click on it. Depending on what brand or make your router is, you may then need to click Security. If yours is a Netgear router, then you will just see an entry on the right labelled “Security options”. The best type of security to use for a home or small business wireless network is WPA2-PSK (AES). Select it from the list.


You will now need to pick a passphrase of 8-64 characters. Select something a little more complicated than the word “password”, write it down or memorise it, and enter it into the box. You will then need to apply these settings by clicking “Apply” or “Save” or “Save settings” or something similar.


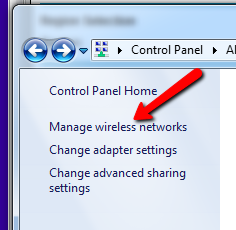
Step 6. Your router will now restart. You will need to change your wireless credentials on any computer that was previously using the wireless connection in the house. This is thankfully quite simple. Click on the Windows (or Start) button, and go to Control Panel. In the top right hand corner select “View by, small icons”. Then go to the Network & Sharing Center. Click on “Manage Wireless Networks” on the left. It should come up with a list of wireless networks, including yours. Right-click on it and click “Properties”.  A small box will pop up. Click the tab at the top that says “Security”, select “WPA2-Personal” from the pulldown list, and then fill out your chosen passphrase in the bottom box. Click OK.


Congratulations, you’re done!

Posted in Technical, Tutorial | Tagged security, tutorial, wifi

Epson TX810FW lost WiFi

Computer Aid Posted on 30 May, 2011 by Luigi Martin30 May, 2011

An Epson TX810FW is connected to the rest of a network using WiFi, and its been working well for a while.

But suddenly, it stops printing.

I take a look, thinking its just lost its IP address, or it cannot find a DHCP server.

Sure enough, its configured to use DHCP, and often, if the DHCP server gives it a new IP address, then suddenly, nobody can print to it.

So I decide to work around this by using a fixed IP address.

But it doesn’t work, as I’m now having problems getting the printer to recognise the WiFi router… The printer has a ping diagnostic, but that fails.

It could be something peculiar with the WiFi encryption (although its been a while since I’ve seen devices that cannot cope with standard encryption protocols.

Just to be sure, I change the WiFi router to have no encryption… but the printer still cannot connect via WiFi.

OK, at this stage there are 2 possible options:

  • The Wifi Circuitry in the printer has failed.
  • The whole network circuitry in the printer has failed.

So I connect the printer using an ethernet cable to the router, and after some configuration, the printer works just like before (but this time with wires).

So once again, I’ve seen WiFi circuitry fail


Posted in Technical | Tagged TX810FW, wifi

HP Mini 1001TU WiFi on Ubuntu Netbook (EasyPeasy 1.6)

Computer Aid Posted on 16 August, 2010 by Luigi Martin16 August, 2010

I have a HP Mini 1001TU netbook with a failed 60Gb HDD (which was running Windows XP).

I removed the HDD. It was a 1.8″ drive, which is difficult/expensive to replace.

I decided to get a 16GB SD card and install Linux.

This will make the Netbook slightly lighter, and also extend battery life slightly.

I decided to install EasyPeasy 1.6 (a variation on Ububtu Netbook).

Installing linux to an SD card can be tricky:

Don’t install the “liveCD” image directly to the SD card, as it will always think that its a read-only media, and any changes you make will not last once you restart the Netbook.

What I do instead is:

  • Make a bootable liveCD from a cheap 1GB USB drive (unetbootin is good for this)
  • Boot from the USB drive, while the blank 16Gb SD card is inserted into the SD slot.
  • Start the “install EasyPeasy” application, and make sure you install to the SD card.
  • Shutdown the netbook, and make sure you remove the USB drive.
  • start the netbook and press F10 -> System Configuration -> Boot options -> boot device priority -> make sure the first boot device is: “USB single flash Reader”
  • Now the Netboot will always boot from the SD card.

My next challenge was getting the WiFi wireless network going.

Everything seemed to be in place, the netbooks WIFi button was in the ON position, but I would not see any wireless network on the network icon (top-right of the screen)

After a lot of searching around, I found the solution was actually quite simple:

  • Make sure the netbook is connected to the internet via the ethernet cable.
  • Click the “System” tab on the bottom-left of the main screen
  • Click on “Hardware Drivers” (near the bottom of the System page).
  • Click “broadcom STA wireless driver”, then install.
  • Once the driver has been downloaded and installed, I usually remove the ethernet cable and restart the netbook.
  • The network icon now allows me to connect to WiFi networks… it works just like any windows-based system… simple!
Posted in Linux | Tagged 1001tu, EasyPeasy, wifi

Windows 7 WiFi authentication requests username and password

Computer Aid Posted on 8 July, 2010 by Luigi Martin8 July, 2010

I was setting up a new windows 7 laptop for a customer.

As I was setting up the WiFi connection, I noticed that the WiFi router was set to use WEP encryption.

I’ve lost count of the number of WiFi networks that have been setup by so-called IT experts, only to find that these experts are living in the past, believing that WEP is good security… what rubbish!

I quickly convince the customer that WPA-PSK is best.

I change the WiFi settings and a change to the SSID (the router say that it has applied the new settings, so I assume that it has done what it has said…

Back to windows 7, I go to the network settings, search for the new SSID (new WiFi name), and then connect to it…but…

I now get a windows security window… and its asking for Network Authentication… it wants a username and a password…

What?

WPA-PSK should only be asking for a password, not a username… and since WEP is similar, then it seems logical that something is wrong with windows7.

Well I fumble around for a bit, until I decide to try restarting the WiFi router…

Once the WiFi router restarts, I am now prompted for the usual WiFi password (no username!).

So, it seems that modem/router/WiFi manufacturers still have problems writing reliable firmware

Posted in Technical | Tagged 802.11, network authentication, wifi, windows 7

eee 1001ha and linux (EasyPeasy 1.6) and WiFi problems

Computer Aid Posted on 10 June, 2010 by Luigi Martin10 June, 2010

Based on my last post, you will know that I am now configuring a new Asus EEE 1001HA laptop.

My customer wants linux, so after some investigation, I decide that EasyPeasy linux is a good choice for a netbook.

Luckily, the 1001ha has the 160Gb drive split into 2 80Gb partitions (ordinarily I would be annoyed at this, and merge the 2 partitions, but this means I’ll be able to dual-boot Linux and XP).

First I download EasyPeasy, and configure it onto a 2Gb SD card,

Then, I boot from the SD card, so that I’m running EasyPeasy in live-CD mode.

I run the HDD installation within EasyPeasy, I select the non-XP partition, but I’m worried that it will delete the MBR, such that I will not be able to boot XP anymore…

Well, here is pleasant surprise: The MBR is overwritten, but the “Grub” boot menu includes Windows XP… So Easy Peasy was smart enough to detect XP, and added it to the boot menu. Very nice.

EasyPeasy is easy to learn, but I found 1 major problem with the eee 1001HA: I couldn’t get WiFi to work.

Apparently, the 1001ha uses the RT3090 WiFi chip (which supports the new 802.11N standard), but the Linux drivers are very patchy in this area.

I found a forum that suggested using the WiCD Network manager… I tried it, but that didn’t work either.

I eventually discovered that there is a bug with the driver for the RT3090 chip… but I also found a workaround at: https://bugs.launchpad.net/ubuntu/+source/linux/+bug/541620

Post 21 shows what to do:

As root:

mkdir -p /etc/Wireless/RT2860STA/
touch /etc/Wireless/RT2860STA/RT2860STA.dat

It seems like the driver is expecting to find the file RT2860STA.dat in a specific folder (that doesn’t exist in EasyPeasy).

Oh well, I’ve done lots of grumbling about Microsoft… I guess this is my first complaint about Linux… it can have poor programming standards.

Posted in Linux, Technical | Tagged 1001ha, EasyPeasy, wifi

HP Pavillion DV6-1107AX WiFi dropouts

Computer Aid Posted on 27 May, 2010 by Luigi Martin27 May, 2010

The DV6-1107AX laptop seemed to have a lot of difficulty connecting to the WiFi network… it would connect only about 1 in 4 times.

I figure: this should be easy… if the WiFi circuit has failed, I’ll just plug in an external USB WIFi adapter.

Getting a WiFi lock seems to work correctly.

Vista reports that the WiFi in connected, but has limited or no internet connectivity.

So its not a password problem, and the laptop is actually connecting to the WiFi access point.

The WiFi signal strength is good.

I re-enter the WiFi password, but that doesn’t help

After a few attempts, I do Windows updates (via ethernet cable)… but that doesn’t help, either.

I’m told that the laptop seems to get quite warm, so I clean out the CPU fan… I wish laptop makers would make it easier to clean the fan… just add a hatch and one screw.

I then try a USB WiFi adapter, and… I get the same problem!!!

So this is looking like a Vista / software problem.

Next, I look at Norton 360… Its always a prime candidate for unusual network problems… But uninstalling Norton doen’t fix anything 🙁

At this stage, I’m left with doing a complete re-install of Vista…

I take the PC back to the office, create the recovery disks, then, before I do a data backup and a re-format, I look more carefully at the windows updates… I find that there are some hardware updates that need to be done… but nothing related to the WiFi… so not much chance of fixing the problem… but manually tick the updates, and force them to install.

Amazingly, the DV6 laptop now maintains its WiFi connection, and never has a problem connecting to the internet…

Who would have thunk it?

Posted in Technical | Tagged dv6-1107ax, wifi

using Edimax BR-6204WLG in client mode WiFi

Computer Aid Posted on 9 May, 2010 by Luigi Martin9 May, 2010

I’m in the market for a cheap client-mode WiFi router, but information is quite scarce.

Looking at my local supplier, I try the very inexpensive TL-WR340G from TP-link… its almost the cheapest WiFi router I can get ($34), and it has WDS… so I figure it should work in client mode. I’ve had good experiences with TP-Link in the past, so this seems promising

Well, I tried, but it wouldn’t work in client mode, and using WDS meant I needed to change my main Netgear Access point to WEP encryption (Yuck!). Its otherwise a good device (3 year warranty!), so I repackage it to be on-sold to the next customer that needs one.

Next, I try the absolute cheapest WiFi router I can buy: an Edimax BR-6204WLG ($29).

Edimax is a relative newcomer to this market, so I don’t know how good its going to be, but given the price, its worth a try.

Initially, I have many problems establishing and maintaining a client-mode connection.

I then decide to update the Firmware (from 1.04 to 1.12). After the upgrade, I found that some Admin pages would have missing buttons…

Oops, this doesn’t look good… maybe I’ve ruined the router (the technical term is: bricked).

Well, after a few factory resets and a few minutes switched off, I finally had it running normally (phew!),

After some trial and error, I found the settings I needed in order to make it work the way I wanted (which allowed me to retire my Linksys router as well!).

So now, from my workshop, I can (once again) plug customer PCs into the ethernet port of a router, and I will be “wirelessly” connected to my main modem/router, and to the internet.

If you want to know how to configure a BR-6204WLG in client mode, then here are a few screenshots of what you need to change (just remember to first upgrade the firmware to at least V1.11):

This shows the main “home” page for the router. Note that the IP address is not the default (192.168.2.1)… the reason is that I changed it to fit with the my main router IP address (192.168.8.121). Also note that the main router has a DHCP address range of 192.168.8.1 – 192.168.8.99. Within the main router (a Netgear unit), I have reserved 192.168.8.88 for the Edimax router.

Select “General Setup”, and you will get this screen.

When you pick “wireless”, you get the main WiFi screen. This is where most of your configuration will occur.

Pick Basic settings, then select Client mode. Enter the SSID of your main router. Note: If you also want wireless computers to use the Edimax as a router (as well as you main router), then tick “Enable universal repeater mode”. I suggest don’t tick it unless you really need it. Click Apply, then go back to the main wireless screen.

Pick Security, then select the Encryption, Cipher, and passphrase key for your main router. Click Apply, then go back to the main wireless screen.
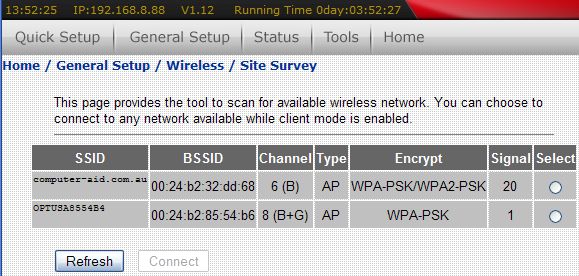
Now go to Site survey, click refresh, and the SSID of your main Router should appear in the list (in my case, its computer-aid.com.au). Click the select box next to the SSID of your main router, then click connect. You should get a “connect successfully” message. Click OK, then go back to the General Setup screen.
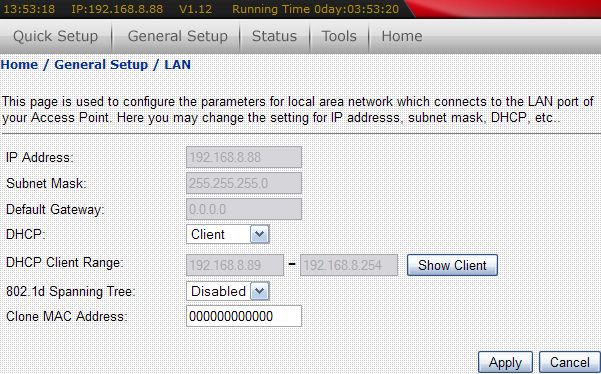
Click LAN, then change DHCP to “client”. This means that the 6204WLG will get its IP address from your main router… and if your main router has a reserved IP address for the 6204WLG, then you will be able to easily connect to it from anywhere on the network.

Now you just need to restart the Edimax Router, restart your PC, and everything should work well.

Posted in Technical | Tagged br6204wlg, client mode, edimax, wifi

Client mode WiFi routers

Computer Aid Posted on 6 May, 2010 by Luigi Martin6 May, 2010

My main workshop is not connected to my house… and I don’t want to string a network cable to it, so my best option is to go WiFi.

Now, since I often work on multiple PCs at the same time, as well as running the main workshop PC… I find I need to have easy internet access from the workshop.

This normally means plugging a customer PC into an ethernet router, and then using the internet almost straight away.

If I use WiFi I need to use a USB WiFi adapter, and install the drivers for it, before I can access the internet.

But with some PCs, this is just not an option… infections and hardware failures can make something as simple as installing a driver an ordeal that can take hours.

But there are a few solutions available.

One solution is called WDS. But WDS seems to have many problems with WPA encryption (which I strongly recommend to anyone using WiFi)… as well as many cases where the throughput speed is halved… It just seems prone to problems, unless I just want to use it as a WiFi repeater (but I want to do much more)

So, my solution is to use a WiFi access point in “client” mode.

What this means, is that the router “pretends” to be a WiFi client (like a laptop or a WiFi-enabled PC). Once you plug a PC into the WiFi router (via ethernet cable), then the PC can access the internet, as if I had plugged it directly into the router in my house.

The only disadvantage, is that if I plug in multiple PCs into the client “router”, then they all share the bandwidth (which, in my case, is unlikely, as 2 or 3 PCs won’t be doing major file transfers at the same time)

Until quite recently, I was using a Netgear access point, connected to a linksys WiFi router (which had faulty WiFi… so I disabled it). From the Linksys, I could connect up to 3 PCs.

A few months ago, the Netgear access point broke down, so I started a search for an inexpensive WiFi router that could work the way I wanted it.

And thats the subject of my next post. 🙂

Posted in Technical | Tagged client mode, wifi

WiFi g-only mode doesn’t work

Computer Aid Posted on 3 May, 2010 by Luigi Martin3 May, 2010

This has happened to me a few times… with a few different WiFi routers, so I suspect its a common flaw.

While setting up wifi accesss, most access points offer options like: B+G mode, B only (up to 11Mbps), G only (up to 54Mbps), and turbo (108Mbps) modes.

To me, it looks like the G-only mode has advantages such as less interference with 802.11b devices, and thus, better speeds and coverage.

I don’t want to support the virtually extinct “B” devices… so flipping the WiFi option to G only, should be an obvious decision, right?

Wrong.

I have found quite a few WiFi routers, when they are switched to G-only mode, will actually switch to B-only mode!

The amount of headache that has generated (for me), means that I now leave the WiFi option to the default B+G mode (or whatever “auto” mode the access point will allow.

Posted in Technical | Tagged g-only, wifi

802.11n wifi and free internet access

Computer Aid Posted on 10 January, 2010 by Luigi Martin10 January, 2010

I was thinking about how the latest version of wifi ( N ) works, and I suddenly realised it has  the potential to revolutionise internet access.

One of the biggest development of the N standard, has been the ability of wifi routers to use multiple channels at the same time.

This means routers can, theoretically, be set up to provide a public channel just for internet access… Eg channel 1, and also provide a private set of channels, to keep your private networked PCs secured from hacking.

If this is developed and widely adopted, then many places will end up with  “ad-hoc” cellular wifi networks, that are run by individuals… all sharing their network access.

Ultimately, it can means you can access relatively free internet access, from most places, without the 3g network charges.

But somehow, I suspect it will die in the same way that direct mobile to mobile (free) phone calls have… Its technically possible (to make mobile phones act like CB radios), but companies don’t want to kill the goose that lays the golden egg!

Posted in Technical | Tagged 802.11N, free internet, wifi

Post navigation

← Older posts

Archives

Categories

Recent Comments

  • Sue Jones on outlook error 0X800ccc0e while sending emails
  • Blair Newmann on AdSmartMedia advertising
  • Private Investigator in GTA on Divorce, consent orders, and superannuation splits: getting the wording correct

Tags

802.11g ADSL amd android bigpond broadband bsod defender dell email exitjunction firefox firewall gmail Google google contacts ie7 infection internet connection ISP laptop Linux m1188a ntldr is missing office 2007 outlook outlook express password power supply ram registry repair install sata scam slow telstra thunderbird Toshiba usb vista wifi windows 7 wireless wordpress xp
Copyright © 2005-2015 Computer Aid
↑