↓
 

Computer Aid

Ph: 0402 133 866

  • Home
  • Blog
  • Contact
  • Web Services
    • Websites
    • SEO
    • Hosting
    • Domain Names
    • Portfolio
Home→Categories Tutorial 1 2 3 >>

Category Archives: Tutorial

Post navigation

← Older posts

Goro page when making google your default search provider

Computer Aid Posted on 2 April, 2013 by Luigi Martin2 April, 2013

I’ve been setting up a few old computers with new installs of XP.

The biggest issue with using internet explorer 8 at the moment is that if you reside outside the USA, microsoft will not let you select google as a default search provider.

The next step is to do a google search for:

google default search provider

And the top item is:

http://www.google.com/homepage/search/

Ie: google “seems” helpful enough to do what Microsoft refuses to do.

But there is a problem:

You go to the page, click on the button that says: “make google my search provider”, then go through the steps to complete the action.

You now feel warm and fuzzy, because the search box at the top right says google…

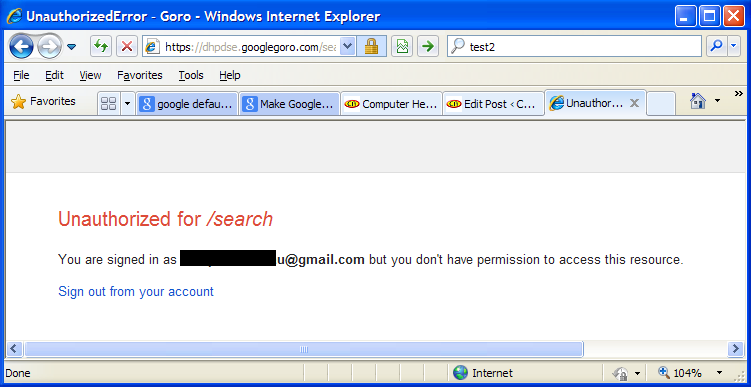
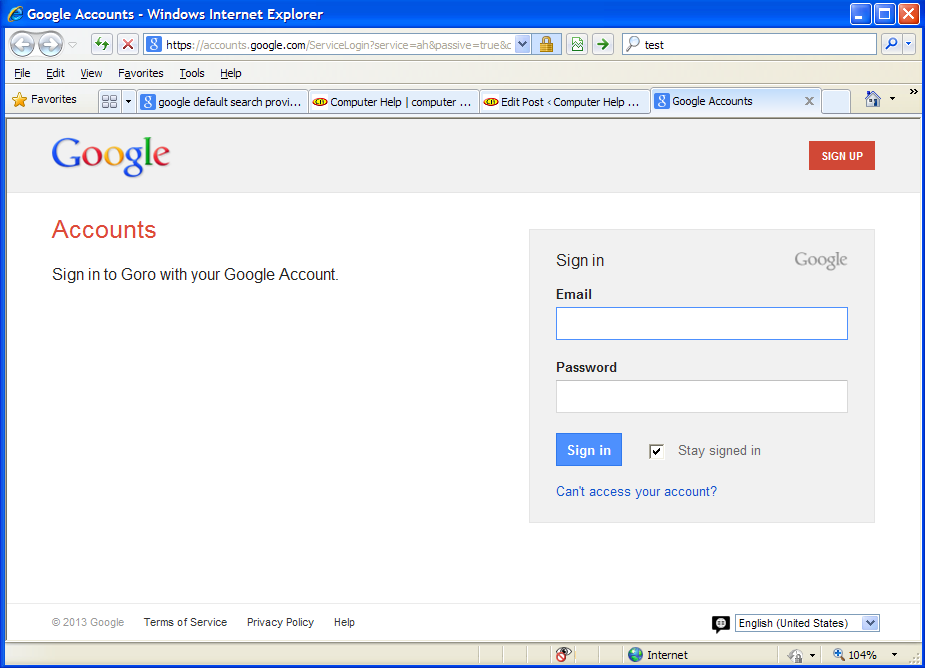
But when you try to search, you get:

goro1

At first glance, I thought I made a mistake, but a closer look shows that Goro is actually part of Google.

So now I’m thinking: did Google somehow stuff up their attempt to change the default search provider away from Bing?

Or is Google trying to force people to switch to a google account?

I tried to login to my google account, and the search provider box then gives me:

goro2

So its now obvious that google have shot themselves in the foot (and Microsoft can breath a tiny sigh of relief… with the unfolding disaster otherwise know as Windows 8, Microsoft need all the help they can get!).

So what do I do? IE8 (as far as I can see) no longer allows you to manually setup your own search provider by entering the appropriate URL… so thats no longer an option.

The eventual (ugly) solution is:

Go to control panel, and temporarily change your “Regional and Language Options” in Control panel… from English (Australia) to English (Untied States 🙂 ) . Then, when you tell IE8 that you want to find more providers, you are given a much wider choice, including Google.

Its starting to feel like Google is getting too big, and are heading down the same path as Microsoft… Lots of big plans, but forgetting to take enough care to dot the “i” and cross the “t”

Posted in Browser, Technical, Tutorial | Tagged default search provider, Google

How to Delete Protected System Files in Windows 7

Computer Aid Posted on 13 September, 2012 by jjfiasson13 September, 2012

In my role as an IT services technician, I find that on occasion you may wish to delete system files that are protected by Windows (such as those in your WinodwsSystem32 folder), and you receive following error message – ‘You do not have permission to perform this action’. In order to manage the particular System File you will need to obtain ownership of it and assign yourself the ability to modify or delete the files.

Resolution

In Windows Explorer, navigate to the folder that contains the files you wish to delete, right-click on it and select Properties from the drop down list.

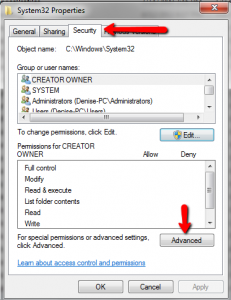
The Properties dialog box opens. Click on the Security tab and then select the Advanced button.

Click on the Owner tab. Currently the name for Current Owner is Trusted Installer. To change the Owner, click the Edit button. Select the account you would like to change the Owner to which would normally be your account or the Administrator account. Tick the checkbox – Replace owner on subcontainers and objects if you want to delete more than one file in the folder. Click OK to continue

The Current Owner should be the account you selected.

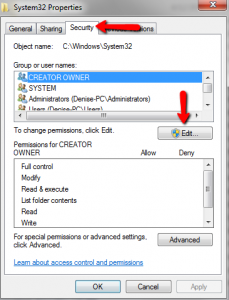
Click OK until you have exited out of System32 properties dialog box and returned to the Windows Explorer screen. Right click on the System32 folder and open the Properties dialog box. Navigate to the Security tab and select the Edit button.

Click on the Username in the list you want to edit the permissions for, which should be the same as the Current Owner (in our case, Administrators account) of the folder. Tick the box to allow Full Control and click OK to continue. Select OK again to return to Windows Explorer.

You should now be able to delete those files or folders without any further issues. For more technical help in Sydney, you can visit my website here.

Posted in Tutorial

How to Pin a Drive to Your Taskbar

Computer Aid Posted on 29 August, 2012 by jjfiasson29 August, 2012

It’s been a long while since I’ve contributed to this blog, but I’ve been busy providing IT support services to businesses in Sydney.

Ever wanted to pin a drive to your task-bar? You might have noticed that doing so would not give the drive its own icon, but rather would add it to the list of available locations in the Explorer icon as per the image below.

As always, there is a neat little workaround that can achieve this.

1. First of all, right-click on your desktop, click New, then click Text Document.

2. Right-click the document you just created and rename it, adding .exe to the end of the file name. You will be prompted with a confirmation box as per below – click Yes.

3. Drag this newly renamed file to your taskbar and it will be pinned as an application.

4. The key step is to now modify the icon on your taskbar by right-clicking on it, and again right-clicking on the filename that shows up in the menu, then click properties.

5. Now you will be in the properties box. The key step here is to change the Target, and optionally the name of the shortcut. As per below, simply change the text in the Target box to whichever drive name you wish the icon to point to. In my case, I wanted it to point to drive F:

6. To change the shortcut name is very easy. Just click the General tab at the top and type in the new name. Changing the icon requires is unfortunately not easily doable.

Don’t forget, if you’re in need of some technical support when you’re next in Sydney, keep Cloud B in mind, our website can be found here.

Posted in Tutorial | Tagged taskbar, windows

Divorce, consent orders, and superannuation splits: getting the wording correct

Computer Aid Posted on 14 May, 2012 by Luigi Martin6 December, 2017

Here in Australia, the processes of getting a divorce and sorting out the split of property, is supposed to be getting easier (for those of us who don’t want (or cannot afford) lawyer fees.

Having just ended a 2+ year process of getting a divorce & a consent order (property settlement), I can see that the scales are still weighted in favor of guiding people away from a DIY solution.

I persisted, and with a fair amount of digging, managed to do it on a minimal budget.

First the usual disclaimer:

  • I’m not a lawyer, so don’t blame me if what worked in my specific situation doesn’t work for you.
  • This only works if both parties are in agreement on the split. If there is no agreement, then lawyers are the only way to go (unfortunately).

In my case, my ex did start getting lawyers involved, assuming I would just agree to whatever they proposed. After strongly disagreeing with a very unfair (for me) series of proposals, she eventually realised that the best results for everyone was to actually talk to me, and come to a mutually agreeable solution.

By that stage, I had taken a gamble and actually filed for divorce in Brisbane. Once someone starts divorce proceedings, the other party cannot normally stop the divorce. The gamble was: once the divorce was final, there was then a 12 month time limit on completing the consent order. If she delayed, then someone was going to have a major inconvenience (eg she could be forced to pay half the mortgage, which I was now paying… but then she could also move back in and claim half the living area… or she could force a sale of the house, to resolve any outstanding equity in the house).

Getting a divorce is actually quite easy, but it should be done after a consent order.

In the end we decided that I would get the house (and a considerable mortgage), while she would get a large chunk of my superannuation.

They say you can do it yourself, but then you get strongly pushed to get legal advice at every turn.

I ignored the “suggestions” to get legal advice… I can be stubborn sometimes. But I also got free (but limited) advice from real lawyers at community centres on many occasions… they won’t do anything for you, but they can point you in the right direction.

In the end we kept our son out of the consent order (it removed many complications), and so we just split the household effects, the 2 cars, the super, and the house itself.

The wording of the actual consent order was mostly straightforward (I can write legal-sounding stuff without too much trouble).

But splitting the superannuation ended up being the biggest problem.

It turns out you must give the super funds involved, 30 days notice of how you are going to split the super, and if the wording of the split is not “correct” (ie it must not make sense to a normal human), then they (in this case, Australian Super) will reject it.

You must get the super fund to agree in writing that they do not object to the split (and send them a “form 6” so that they can legally disclose how much money is in the super fund), before you file the consent order to a magistrate.

In the end, these are the orders that were approved (I’m publishing them here, in the hope that they will help minimise frustration for someone else in a similar situation)

The main part goes like this:

CONSENT ORDERS

BY CONSENT IT IS ORDERED

  1. That the applicant will retain ownership, all interest and liabilities in the business “XYZ Widgets” and the respondent relinquishes any claims in relation thereto.
  2. That the applicant will retain the family home at 2 Divorce Court, Deception Cove, VIC 7654, (the Home), and will also be fully and solely responsible for any mortgages, debts and Lines Of Credit, related to the Home.
  3. That the respondent fully relinquishes the family home at 2 Divorce Court, Deception Cove, VIC 7654, (the Home) and all associated liabilities, and is obliged to sign any relevant documents relating to relinquishing ownership and refinancing of the Home, within 30 days of receiving said documents. If a signature cannot be obtained within 30 days, then the court will be authorised to sign on behalf of the respondent.
  4. That the respondent will retain the red 1965 Hyundai Getz 5 door hatch.
  5. That the applicant will retain the white 1966 Hyundai Getz 3 door hatch.
  6. That the respondent will retain all furniture, appliances, and any other goods that have already been removed from the family home at 2 Divorce Court, Deception Cove, VIC 7654.
  7. That the applicant will retain all furniture, appliances, and any other goods that are currently at the family home at 2 Divorce Court, Deception Cove, VIC 7654.
  8. That in accordance with section 90MT(1) ( b ) of the Family Law Act 1975, (the Act), whenever a splittable payment within the meaning of section 90ME of the Act becomes payable to or on behalf of Basil Bushy from his interest in his Australian Super Superannuation account, Sandy Beach Bushy is entitled to be paid (by the Trustee of Australian Super) the amount calculated in accordance with Part 6 of the Family Law (Superannuation) Regulations 2001, using a base amount of $25,000 and there is a corresponding reduction in the entitlement that Basil Bushy would have had but for these Orders.

The Superannuation Fund responsible for the split of funds will be Australian Super. The applicant currently has funds with Australian Super (account number 123456789). The respondent currently has funds with Australian Super (account number 987654321).

 The operative time for order 8 is: 4 business days after the service of the final orders on the trustee.


Notice the weird wording of part 8 (which just means please transfer $25,000 from Basils super account, to the super account of Sandy Beach Bushy).

Also note that in part 3: the party thats giving up ownership of the house cannot stall or delay the transfer of house ownership by refusing to sign… as the court can now sign on behalf of the recalcitrant party.

Posted in Musing, Rant, Tutorial | Tagged consent orders, divorce, superannuation, wording

7 Benefits of Payroll Software for Small Businesses

Computer Aid Posted on 3 May, 2012 by be3 May, 2012

As new small businesses begin to expand, paperwork can become out of control and automation of some tasks a necessity. When you are a one person show, a filing cabinet and a couple of spreadsheets will be enough to sort out your profit, your pay and your tax but when you begin to employ staff, or segregate existing staff into departments, payroll software should be taken into consideration. If you are unsure as to whether your business needs this software have a look at the seven key benefits below:

1.)    Improved Efficiency In Payroll

Payroll is a complicated department that requires the utmost accuracy, and quite rightly too, no employee will be productive if their pay is wrong. Processing payroll manually requires a number of complex calculations, such as individual tax calculations for each paycheque; this wastes time that could be spent more productively. Payroll software can perform these tasks automatically once an employee’s details have been entered.

2.) Avoid Duplicate Records

When a number of departments (HR, Accounting Services, Payroll etc…) are using different software to collate payroll data it can often result in a number of duplicate records being created in the process. With one piece of payroll software that all departments could input data into this needless waste of time is eliminated. In addition to this, payroll software will more often than not allow customised security access for different departments. So, if security between departments is a concern, this is a feature to look out for.

3.) Track Employee Time

While ‘tracking’ employees may sound a little Orwellian, time tracking is actually beneficial to both the employee and the business. Employees on an hourly rate will receive the exact level of pay they are due (so no overtime ‘goes missing’) and the business can save time by reducing the effort and expense cause by incorrect time management by employees. The time is tracked using a clock within the payroll software’s daily log.

4.) Create Reports Quickly and Easily.

As would be expected, general payroll reports can be created by the software allowing managers a chance to review financial information. More specific reports can also be created though. Daily time logs can be reviewed with time reports. Employee lists can be created to help human resources, hiring and training staff. The accounts department can get help filing taxes via withholding reports and so on… a report can be created for almost any department where the software is in use.

5.) Simplify Tax Filing

Tax is nobody’s friend, so getting help to lighten the burden it has on your business is always good news. Manually processing tax can cause errors and we all know how unsympathetic the taxman is when it comes to mistakes. Payroll software will also become aware of changing tax laws via updates. So, instead of risking expensive errors, let the payroll software do this for you.

6.) Save Money

Time is money – it is an old business cliché but a true one none the less. Running payroll with software saves time that would be wasted with compiling information, making calculations and altering records.  Simply put, saving time lowers overheads, which in turn, increases profit margins.

7.) Free Time

Time may be money but it is also opportunity. By minimizing errors and making the business more efficient payroll software offers the business owner the opportunity to seriously consider how to use all their new found time productively.

Posted in Tutorial

The importance of regular data backups in case of a HD failure

Computer Aid Posted on 16 February, 2012 by be16 February, 2012

Its now easier to do backups in Windows 7 than in any of the previous versions of Microsoft’s aging desktop operating system.

Simply open any folder containing the data you want to backup (folder “A”) and click “copy address” in the toolbar.  Close that folder, open the destination folder (folder “B”, which should be on either an external drive or another partition), and either right-click any empty part of the window and hit “paste”,  or hit Ctrl+v.

The contents of folder A will then be copied over into folder B. It’s just the old copy and paste, but easier once you have the routine.

It won’t suit everyone, of course, but its ideal if you just want to backup generic folders like “My Documents” or “My Photos” for example.

It would have been a whole lot clearer if they’d said “Copy this folder” instead of just “copy address” which doesn’t make much sense. Why Microsoft had to make it so non-intuitive I’ll never know!

Don Penlington

Posted in Technical, Tutorial

Which is the best online services for the businessman on the go and how can he benefit from it?

Computer Aid Posted on 2 February, 2012 by RoxannePeterson2 February, 2012

The era of the mobile office has truly transformed business people’s lives. Formerly obliged to attend a physical office in person every day for set hours, with long commutes and fairly ineffective working practices to contend with, today business people can work flexibly wherever they wish, using the power of technology to carry out their jobs more effectively.

Business Changes

The advent of new technologies doesn’t simply change the platform or equipment that applications are delivered on – it also changes cultures. Mobile working and wireless-internet facilities provide the scope for flexible work patterns and negate the need for a physical office space. Staff can work from home, at client locations and also remotely while traveling. This has huge potential benefits in terms of cost savings on fixed overheads and office servicing, time, carbon-emission reductions and improved staff morale.Where once distance was seen as a problem, it now poses no barrier, as online networks allow remote teams to communicate and collaborate across wide areas. Web conferencing, file sharing, online collaborative work spaces and other tools facilitate remote business and often improve its effectiveness. Each piece of technology has its own benefits that can help businesses to grow, while keeping costs down.

onConference

This useful app offers web conferencing and local-to-international conference calling. One of its key benefits is the ability to teleconference using existing phone lines rather than the internet. There are call-recording options to capture meetings for later playback and a free Meeting Manager service online that sends out invitations in a simple, professional and streamlined format. You can use interactive webinars and even share your personal desktop, so that other enabled users can see data, documents and applications first hand. The package is paid for by user and by minute, rather than by a subscription, so it can be great value for money.

SlideShare

SlideShare allows users to upload PowerPoint presentations for either private or public viewing. It’s compatible with Open Office (a free equivalent to Microsoft Office) and Mac Keynotes and there are both free and paid for ‘Pro’ options available. Once the slides are uploaded, they can be viewed by up to 60 million visitors a month, helping to generate a little awareness and buzz about your products and services and opening the door for new connections and linkages. If you need ideas for a sales presentation, the website allows you to browse for inspiration or use an existing template to work from.

GoToMeeting

There’s a 30-day trial for this service that’s entirely free and worth a try. It offers online meeting spaces and video-conferencing for up to 15 people using PCs, iPads, Macs or smart phones. If you want to sign up to the full service, it costs a flat rate of $49 dollars a month to host as many meetings as you want. It’s a cost-effective option for allowing project groups, disparate teams, clients, training groups or sales staff across branches to catch up quickly, efficiently and cost-effectively. It can improve productivity through shorter meeting times and the reduced need for travel. For someone managing a business across several locations, it is an extremely useful tool.These are just some of the services available for the technologically aware business person. New ones are being released all the time, offering new features and even greater benefits.

About the Author:

The above article is composed and edited by Roxanne P. She is associated with many Technologies communities as their freelance writer and adviser. In her free time she writes articles related to mobile applications,  social media, dsl internet providers related articles etc.

Posted in Review, Tutorial

wordpress weaver theme: how to change the sub menu width

Computer Aid Posted on 30 January, 2012 by Luigi Martin30 January, 2012

I’ve recently started using the weaver theme for WordPress.

One of the biggest mental hurdle to jump over, is to not directly alter the CSS stylesheet, but to use the CSS sections under the main options menu of the Weaver Admin panel, and in some cases, the <head> section of Advanced Options

However, I did find that using google to find the correct snippet of CSS code really didn’t work well, since most people go straight to altering the CSS stylesheet.

But I soon found out how to “uncover” the correct CSS on my own.

A good example was the menu bar along the top of:

Home Loan Advisors

I added the CSS:

{font-size:180%}

to the CSS sections for “Menu Bar text”, “Menu Bar hover” and “Menu Bar current page”

This made the menu font just the right size I wanted.

However…

The drop down menu was a fixed width, so the sub menu words were wrapping around, causing an ugly mis-alignment of the gradient background.

The solution:

I found someone who mentioned changing the #access and #access2 section in the stylesheet, but I decided to carefully look at the stylesheet myself (Appearance -> Editor)

The stylesheet is reasonable well documented, so I went to the menu section of the stylesheet, looking for something about “width” and a size of about 100 to 300 px (pixels)… which is what I guessed was the width of existing sub menu.

it didn’t take long to find a section that looked like this:

#access ul ul,
#access2 ul ul,
#access3 ul ul {
    box-shadow: 0px 3px 3px rgba(0,0,0,0.2);
    -moz-box-shadow: 0px 3px 3px rgba(0,0,0,0.2);
    -webkit-box-shadow: 0px 3px 3px rgba(0,0,0,0.2);
    display: none;
    position: absolute;
    top: 38px;
    left: 0;
    padding-left:0px;
    float: left;
    width: 180px;
    z-index: 99999;
}

So, what I wrote in the Advanced Options -> <head> was:

#access ul ul {width:240px;}
#access2 ul ul {width:240px;}
#access3 ul ul {width:240px;}

I was close: that altered the menu width, and the background shadow, but the gradient background hadn’t increased in width.

Another look at the stylesheet showed this code:

#access ul ul a,
#access2 ul ul a,
#access3 ul ul a {
background: #333;
line-height: 1em;
padding: 10px;
width: 160px;
height: auto;
}

So I also added the following code to the <head> section:

#access ul ul a {width:220px;}
#access2 ul ul a {width:220px;}
#access3 ul ul a {width:220px;}

Bingo!

Just the right width!

However, some alterations are more difficult than others.

Ultimately, more comprehensive documentation (or even more meaningful variable names), would make this process a lot easier.

I mean, why call sub menu widths: “access”, why not just call it “sub-menu-width”?

Posted in Rant, Technical, Tutorial, Wordpress | Tagged sub menu, submenu, weaver, width

Solid State (SSD) or Hard Disk Drive (HDD): Which is Better?

Computer Aid Posted on 20 January, 2012 by be20 January, 2012

If you’re in the market for a new computer, you’ve probably been searching high and low for the latest and greatest features that will make your new purchase the best it can be. You may even have seen that some PCs now come with a choice of hard drive type: the ‘traditional’ hard disk drive (HDD), or the relatively new solid-state drive (SSD). Faced with this choice, lots of computer buyers will end up puzzled, and have no idea what makes each of the choices different or better. SSD drives are not yet standard in PC shops, and you’re far more likely to encounter conventional HDDs in new builds; however there are a few reasons that you may want to switch to SSD at some point in the future. So whether you’re about to buy new or you’re looking for the future of hard disk storage, let’s take a look at the differences between HDD and SSD, and which of them is best for you and your needs.

What is a hard disk drive?

A conventional HDD is, in a way, a ‘mechanical’ storage solution. The reason for this is that these drives are made up of a physical disk, with a needle that ‘scratches’ the data onto it. This is a simplified version of what goes on inside an HDD, but it does explain the sound that you hear when a drive is reading or being written to. The noise is actually just the movement of the magnetic arm (known as a ‘head’) as it moves to various points of the disk (known as a ‘platter’) and stores data in binary form by flipping theoretical switches. The read and write process of an HDD can be quite time-consuming because of the amount of physical movement necessary to read the data. Another down side to HDDs is that they are susceptible to shock damage – drop one and you could lose everything in seconds, and that could result in a big office insurance claim. They also become unreliable over time, and with the arm so close to the platter, ‘scratch’ damage is a real possibility.

What is a solid state drive?

The newer SSD drives have a fundamental difference: data is stored on chips rather than physical disks. These chips are usually flash memory, meaning they’re quicker, lighter, and smaller. There are no moving parts in a SSD drive, so very little chance of shock or physical damage (barring total destruction, of course). Access rates are the same as HDD, however they ‘get up to speed’ instantly, so your boot times will be faster. Flash storage is used everywhere these days: in phones, USB drives, MP3 players, and so on. It’s a technology that’s advancing at a lightning pace, and will no doubt replace HDD storage in a matter of years. The fact that SSD drives are smaller and quieter is just the icing on the cake.

Which should you choose?

The truth is that from a practical point of view, SSD drives are the better choice. They’re smaller, lighter, quieter, and have less chance of accidental damage or wearing out. The amount of data you can store on SSD drives is growing all the time, meaning that inversely the size of computers will be able to come down. At present we’re still reliant on ‘towers’ and other large desktop PCs – with SSD drives in place, these units could be made much smaller.

You’d be forgiven for thinking that your search ends here, but don’t run out and pick up that SSD just yet – there’s one large barrier to entry: price. At the present time, solid state drives can be up to twice as expensive as their HDD counterparts. That means you’ll have to cough up a lot more money for the same amount of storage. So, the bottom line has to be, if money is no object (lucky you), go for a SSD drive. It will serve you well for years to come. On the other hand, if you want an affordable drive that’s still reliable, go for a hard disk drive. You’ll be able to get much more for your money, and the drive will still last for a good few years.

Posted in Technical, Tutorial

Reset settings for Brother HL-4040CN for more toner life

Computer Aid Posted on 12 August, 2011 by Luigi Martin12 August, 2011

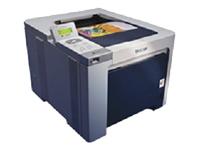
I have a brother HL-4040CN colour laser printer, and it just started saying that ALL 3 colour toner cartridges had run out (and would refuse to print)

Now, I know I print more yellow than any other colour, so telling me that all 3 need to be replaced it just a lie!

I find out that the cartridges that I use are compatible with the following numbers: TN-115, TN-135, TN-155, TN-175

I had a look at the cartridges, and on the side, is a small circular “window” of clear plastic, where I assume the printer shines a light, to see if it gets to the other side (and then guess how much longer the cartridge will last before it actually runs out.

Obviously their guess is wrong (and I suspect its deliberately wrong… for financial reasons… it means Brother gets to sell more toner).

This is particularly annoying, when I see the clear window is half way between the top and the bottom of the cartridge.

So after a bit of searching, I find a way to trick the printer into using all the toner:

  1. Place a small piece of dark electrical tape over the clear window. Don’t use anything clear or shiny, as the printer might receive a “false empty” signal. I just did it to all 4 cartridges… even the black one that still had plenty of toner.
  2. With the front cover still open, press and hold the “cancel” button.
  3. while holding the cancel button, press the reprint button.
  4. You should now see  Reset Parts Life menu in the LCD screen.
  5. Use the up/down arrow to select the cartridge life you want as follow:
  6. B.TNR-S = Black standard toner
  7. B.TNR.H = Black high-yeild toner
  8. C.TNR-S = Cyan standard toner
  9. C.TNR.H = Cyan high-yeild toner
  10. M.TNR-S = Magenta standard toner
  11. M.TNR.H = Magenta high-yeild toner
  12. Y.TNR-S = Yellow standard toner
  13. Y.TNR.H = Yellow high-yeild toner

So I reset all colours to high-yeild, and now I can use the printer until all the toner is truly finished.

I close the front cover, and I can now print again.

Posted in Tutorial | Tagged HL-4040CN, life, TN-115, TN-135, TN-155, TN-175, toner, trick

How to secure your WiFi wireless home network

Computer Aid Posted on 25 July, 2011 by jjfiasson25 July, 2011

It is crucial to secure your wireless network to ensure that your internet connection can be used only by yourself and people you authorise.  I have seen many occasions where clients have not secured their networks and wondered why their internet bill shot through the roof.  There is also a potential security risk if your wireless network is not secure and you have file sharing turned on – others will be able to access your files! Thankfully the procedure for enabling wireless security is relatively straight forward.

Note: This guide is written with Windows 7 in mind, although the procedure is quite similar for Windows XP and Windows Vista.

This is a guest post by JJ Fiasson from IT Support Sydney.

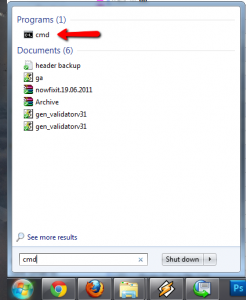
Step 1. Click the windows button in the bottom left hand corner of your task bar. In the search box type “cmd” and hit Enter. A black box will open up with the command prompt.

Step 2. Type in “ipconfig” and hit Enter. We want to know the address of your router, should show up under the entry for “Default Gateway”. The IP will be something like 192.168.1.1 or 10.1.1.1. Write this down.

Step 3. Open your favourite browser and type the number into the address bar that you just wrote down. E.g. http://192.168.1.1

Step 4. Assuming you completed steps 2 & 3 correctly, you will be prompted to enter in a username and password. If your router is a Netgear, the default login should be “admin” as the username and “password” as the password. For Linksys, try “admin” and “admin”. You can also try “admin” and leave the password box empty. If these don’t work, it might be worth Googling for your router make and model with the words “default login”, to try and find out what they are by default. If you can’t seem to track them down, you might need to contact whoever setup your router in the first place and ask them what they set it to. Otherwise, you’ll need to reset the modem/router (not recommended unless you know what you’re doing).

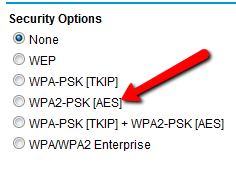
Step 5. Hopefully you figured out the correct login credentials for your router. You should now see a few menu items and a lot of other information. What we are looking for is a menu item labelled “Wireless”, “Wireless Settings” or similar. Click on it. Depending on what brand or make your router is, you may then need to click Security. If yours is a Netgear router, then you will just see an entry on the right labelled “Security options”. The best type of security to use for a home or small business wireless network is WPA2-PSK (AES). Select it from the list.


You will now need to pick a passphrase of 8-64 characters. Select something a little more complicated than the word “password”, write it down or memorise it, and enter it into the box. You will then need to apply these settings by clicking “Apply” or “Save” or “Save settings” or something similar.


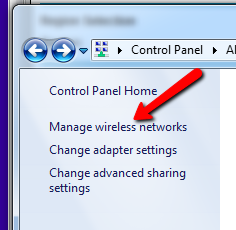
Step 6. Your router will now restart. You will need to change your wireless credentials on any computer that was previously using the wireless connection in the house. This is thankfully quite simple. Click on the Windows (or Start) button, and go to Control Panel. In the top right hand corner select “View by, small icons”. Then go to the Network & Sharing Center. Click on “Manage Wireless Networks” on the left. It should come up with a list of wireless networks, including yours. Right-click on it and click “Properties”.  A small box will pop up. Click the tab at the top that says “Security”, select “WPA2-Personal” from the pulldown list, and then fill out your chosen passphrase in the bottom box. Click OK.


Congratulations, you’re done!

Posted in Technical, Tutorial | Tagged security, tutorial, wifi

Post navigation

← Older posts

Archives

Categories

Recent Comments

  • Sue Jones on outlook error 0X800ccc0e while sending emails
  • Blair Newmann on AdSmartMedia advertising
  • Private Investigator in GTA on Divorce, consent orders, and superannuation splits: getting the wording correct

Tags

802.11g ADSL amd android bigpond broadband bsod defender dell email exitjunction firefox firewall gmail Google google contacts ie7 infection internet connection ISP laptop Linux m1188a ntldr is missing office 2007 outlook outlook express password power supply problems ram registry repair install sata scam slow telstra thunderbird usb vista wifi windows 7 wireless wordpress xp
Copyright © 2005-2015 Computer Aid
↑